
Introduction
At first: Go is a fascinating language. The language addresses many issues other languages are having and as you may have noticed there got a bunch of new programming languages released in the last years like Rust(2010), Elm(2012) or Crystal(2014) for example, which all try to do something better than the ancient ones. So it’s important to keep track of actual language benefits to pick the right tool for the job.
Go was designed at Google in 2007 to improve programming productivity in an era of multicore, networked machines and extremely large codebases.
source: Wikipedia
In simpler terms: the goal was to design a simple, easy to understand and fast language.
Google had problems to onboard new employees. It took a massive amount of time until they got productive in Google’s huge codebases full of C++ and Java. They wanted to address the issue with a simpler programming language. That’s how Go was born.
The most famous people who helped designing the Go-language are Robert Griesemer who is known for his work on Hotspot and the JVM, Rob Pike who is known for his work on the Plan 9 operating system and UTF-8 and last but not least Ken Thompson who is primarily known for the development of the UNIX operating system and co-authoring the C programming language together with Dennis Ritchie. But also the predecessor, the B programming language, early artificial chess computers and also, together with Rob Pike, he was involved in the development of UTF-8 and Plan9.
To summarize: People who seem to know what they are doing.
After two years of development, Go reached the first stable version and got released in November 2009.
Characteristics of Go
The language is reduced down to 25 keywords only. If you compare that to the count of other languages it is significantly smaller.
I’ve found this comparison here, but I must admit that I don’t know how accurate it is
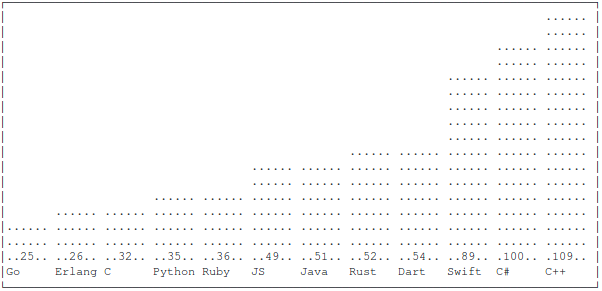
source: Github
It has a C-like syntax and is build in Assembly and C++. Go provides imperative patterns as well as object-oriented patterns you will see later how this plays together. Go enables you to easily write concurrent code with just one keyword, called goroutines which you see in detail later too.
Go compiles to a single binary, which includes everything you need to run it. You don’t need any system library on your machine or anything else. That means that the binary is relatively big, a simple hello world example is 1.9 megabytes in size. However, even in real life projects, I’ve never got as big as 10 megabytes or more. I know this sounds like a lot, but I think when considering the specifications of today’s computers this isn’t a problem at all.
You can also easily cross-compile Go programs from any machine for different platforms. It’s all handled by two environment variables. More on that later.
And it’s fast, of course, that was one of the goals when developing the language.
Tooling
Go has batteries included.
Standard Library
Go has a huge standard library and you can write very complex tools without using any third party dependency. If you want to have a look at the standard library you can find every available package as well as their documentation at the official website golang.org.
gofmt
It comes shipped with a formatter for your go code called <gofmt|go fmt>. It’s not like in the Javascript world where half the users are using prettier, others using some other linter, xo for example, which also helps to format code and some others don’t use anything at all. If you find a Go repository somewhere in the wild it is most likely formatted with gofmt. There are editor plugins for every editor which runs the program on your code on save. Personally, I’ve never seen Go code which wasn’t formatted with gofmt.
go vet
Go also ships with go vet which is a linter to prevent you from common errors. The description of the tool itself:
Vet examines Go source code and reports suspicious constructs, such as Printf calls whose arguments do not align with the format string. Vet uses heuristics that do not guarantee all reports are genuine problems, but it can find errors not caught by the compilers.
This is really a short summary and it catches many more errors even if not all. It is a great help in development.
Testrunner + Benchmarker
Go has a test runner and benchmarker included. Everything you need to do is if you have a main.go file to create a main_test.go file. Then you can run go test or go test -bench=. if you are in the same directory. How a test file looks like we will see later.
package management
Go also has a simple mechanic to use dependencies. You import them as every core library but instead of only the name you are using the GitHub link like import "github.com/<user>/<repository>" and that is all.
There are some pitfalls by that. Go always uses the master branch of the package which is kind of bad. But there are alternatives. One which is very common is to clone the remote repository and put it in your own version control in a vendor directory. This is called vendorizing but is also not the perfect solution. There is gopkg which does help in this case and you can require explicit branches or tags. You would require it like import "gopkg.in/<user>/<repository>.<tagname|branchname>". This is a bit better and you can rely on semver. At last, there was released a tool named dep, which looks like a more sophisticated solution. There you can specify in a special file (Gopkg.toml) which dependency you want and either which branch, version, tag or commit hash you want. You can also include version ranges like in package.json or composer.json for example. It also creates a lock file to ensure everyone gets the same dependencies. Dep isn’t in the core yet, but it’s widely used and I think the recommended method to do dependency management in go today. It’s from the Go authors and is called an “official experiment”.
Since version 1.11 Go ships with go mod which is very simple to use. You start with go mod init github.com/<username>/<reponame> which creates you a go.mod file with the module name and the current Go version:
module github.com/<username>/<reponame>

go 1.12
When you import something in your source and do a go build your go.mod file is automatically updated and contains the dependency you need together with some version information to be able to do reproducible builds.
Along the way there was also a go.sum file created which contains some cryptographic hashes of the content of the dependency modules.
If you want to learn more you can read the Go wiki on Modules.
Documentation
The documentation is generated by code comments. Even the documentation for the standard library is documented by comments and you can also include examples which can be run from the documentation page itself. Look at the strings.Compare function for example. So you get documentation for your package automatically when you act like a proper developer and comment your code. ;)
Go report card
There is Go Report Card where you can simply put in your repository and let seven different linters run over your projects which are specialized on different issues which is also very helpful for your code quality.
Who is using Go?
Go is widely used especially in the DevOps scope, for automating things, but can also be used for everything else. One big Go user is of course Google. But there are more, the most widespread tool written in Go is probably docker. If you want to see a big list of companies who are using Go you can find it on the Go Wiki.
But now …
Talk is cheap. Show me the code.
As Linus Torvalds would say.
Code examples
You can find every code example on Github
Hello World
A simple Hello World program looks like this:
// helloworld.go
// every go file belongs to a package
package main

// we import "fmt" from the standard library
import "fmt"

// our main function
func main() {
	// Prints out "Hello World!"
	fmt.Println("Hello World!")
}
We need to define the name of our package. Every go file needs to start with a package name. After that, we define our imports. Everything that is in another package needs to be imported like that. The function keyword known from most languages is shortened to func. In our main function, we call the Println function from the fmt package (fmt stands for format) with a string which gets printed out to the console when we run go run helloworld.go. We could also go build and execute the binary the go compiler is creating, which is called like the folder we are in or if we provide a binary name like the name we are providing and executing that binary. go build -o binaryName helloworld.go && ./helloworld. But I find the go run shortcut better to integrate into the development workflow as it is shorter and doesn’t need as many steps.
I will leave out any not needed boilerplate code in the below examples to keep them readable and understandable with focus on the important parts. This means they have errors like unused variables and so one, if you want to look for executable examples look at the Github Repo.
Variables and Constants
// variable declaration
var a string
// variable initialization
a = "variable initialization"

// variable declaration and initialization
var b string = "variable declaration and initialization"

// sugar for declaration and initialization
c := "sugar for declaration and initialization"

// would produce an error, as this declares the variable again
// c := "reassign c"

// works as this don't declare c again
c = "reassign c"

// declare multiple variables at once
var d, e string

// declare and initialize multiple variables at once
var (
  f bool = false
  g string = "hey"
)

// define a constant
const MY_CONSTANT int = 1
// error, constants can't change their value
// MY_CONSTANT = 2
That’s pretty straight forward. The only pitfall is when using the := operator, which declares and initializes the variable at once inferred of the type you provide as a value. If you want to reassign a variable you can not do it with := and you need to use =.
What is needed to know is that variables are scoped. So when declaring a variable inside an if-block, it is only available inside this block. Same for functions or files. Yes, you can have global variables, but as a common joke among programmers, the best prefix for global variables is //.
If
if true {
	// would be executed
}

if false {
	// would not be executed
} else {
	// would be executed
}

if false {
	// would not be executed
} else if true {
	// would be executed
} else {
	// would not be executed
}
I don’t think this needs explanation, except that you don’t need parentheses in simple if comparisons. (:
Switch
c := '&'
// this would fail with the default branch
// delete the leading // to try this out
// c = 'a'
switch c {
case '&':
fmt.Println("&")
case '<':
fmt.Println("<")
case '>':
fmt.Println(">")
case '"':
fmt.Println(""")
default:
panic("unrecognized escape character")
}The default branch is optional, but I would recommend adding a default branch to every switch statement.
Loops
for i := 0; i <= 5; i++ {
	fmt.Println(i)
}

for i := 0; i <= 5; i++ {
	fmt.Println(i)
    // doesn't execute the loop the fourth and fifth time
	if i == 3 {
		break
	}
}

for i := 0; i < 5; i++ {
	if i < 2 {
    	// wouldn't print the value of i
        // when i < 2, so the first two loops
		continue
	}

	fmt.Println(i)
}

// equivalent of a while loop
sum := 1
for sum < 10 {
	sum += sum
	// would be 16 at the end
}

var array = [5]int{10, 20, 30, 40, 50}

// equivalent of a foreach loop
for key, value := range array {
	fmt.Println(key, value)
}

// inifite loop
// for {
// 	fmt.Println("infinite ...")
// }
Loops are working like I would expect them to, except that there is only one keyword to use and not 3 or more (while, for, foreach, etc.) and depending what you put in there it behaves differently.
Functions
// a simple add function with to arguments
// and an int as return value
func add(a int, b int) int {
	return a + b
}

func main() {
	// call the function
	result := add(1, 2)
}
There is nothing special to it, this is like every other language is doing it.
Multiple return values
But now for something cooler, you can have multiple return values:
// multiple return values,
// one of my favourite feature of Go
func getCoordinates() (int, int) {
	return 1, 2
}

func main() {
	// call the function and assign the values to x and y
	x, y := getCoordinates()
 	// call  the function and throw away the second return value
  	x, _ = getCoordinates()
   	// call  the function and throw away the first return value
	_, y = getCoordinates()
   	// call  the function and throw away both return values
	_, _ = getCoordinates()
  	// the same as the one directly above
	getCoordinates()

  	// would produce an error:
  	// multiple-value getCoordinates() in single-value context
 	// x = getCoordinates
}
The multiple return values feature is really cool I think! No need to create objects or arrays like in other languages and later check how many items are in there or which fields are filled. It really eases the development workflow and you can focus on the important parts. Also if you don’t need any return value and you put in an _ Go doesn’t allocate memory for it. if you don’t care for a return value at all you can omit the variable assignment but if you assign fewer variables then the function returns you will get a compiler error, which is good to prevent yourself from mistakes!
Named Return Values
Functions can have named return values, I’ve never used it but I think it comes in handy when you have many variables with slightly similar naming.
// in case the function would be easier to read then
func namedReturnValues() (x int) {
	x = 3
	// do very complex stuff
	return // would return x
}
Defer
Defer is a keyword you can put in front of a statement and this statement gets executed at the end of the function.
// defer is always executed at the end of the function
// so you can not forget to close some buffers, files or connections
func myDeferFunc() int {
	defer fmt.Println("This should be printed at the end")
	// do very complex stuff
	fmt.Println("complex stuff completed")
  	return 1
}

func main() {
 	fmt.Println(myDeferFunc())
}
The output of this is:
complex stuff completed
This should be printed at the end
1
As we can see, the defer is executed at the end of the first function, but before the main function is executed further.
Inline aka Anonymous Functions
You can create anonymous functions, if you have a background in functional programming or javascript, for example, you have probably done it several times. It’s good when you use something only one time and so it doesn’t need to be extracted into an own external function. Here is how it looks like:
// inline function aka anonymous function
add := func(x int, y int) int {
	return x + y
}
fmt.Println(add(1, 2))
Pretty much like a normal function but you assign it to a variable which you can call later.
If you want to create an immediately-invoked function expression you can do it by adding () at the end of the function and it gets executed without calling it later:
func() {
	fmt.Println("HELLO WORLD")
}()
Variadic Functions
Variadic functions are functions which can accept n arguments of the same type. They get packed into an array and can be used then.
// variadic functions can take
// as many arguments of the same type as you like
func myVariadicFunc(ints ...int) {
	fmt.Println(ints)
}
If you call that function with myVariadicFunc(1, 2, 3) you will get \[1 2 3\]. If you call it with myVariadicFunc(1, 2, 3, 4, 5) you will get \[1 2 3 4 5\].
If we want to create a sum function which can take as many integers as we want we can define it like this:
func sum(ints ...int) int {
	result := 0

	// loop over the int array
  	// and throw away the key (which would be the array index)
	for _, value := range ints {
		result += value
	}
	return result
}
If we call that function with sum(1, 2, 3, 4, 5) we would get back 15 as expected.
Passing Functions around aka Functions as first class citizens
You can pass functions around. Again, if you come from functional programming or Javascript this might feel natural for you, but many languages are lacking this feature. To be honest
// We need to declare a type Convert
// which is a function which takes a string as an argument
// and returns a string
type Convert func(string) string

// first convert function
func ask(smth string) string {
	return fmt.Sprintf("%s????", smth)
}

// second convert function
func exclamate(smth string) string {
	return fmt.Sprintf("%s!!!!", smth)
}

// convert takes a string and a function which is of type Convert
func convert(smth string, fn Convert) string {
	return fmt.Sprintf("%s", fn(smth))
}

func main() {
	fmt.Println(convert("what", ask)) // produces "what???"
	fmt.Println(convert("what", exclamate)) // produces "what!!!"
}
Structs
Structs are a way to mimic object-oriented programming in Go. Let us declare a Person struct:
// declare a struct named Person
type Person struct {
	name string
	age  int
}
A person has a name of type string and an age of type int. Let us create an instance of that type:
// create an instance of the struct
me := Person{"Max", 28}
Now we can define functions that run on that type of struct:
func (p Person) sayName() {
	fmt.Println("My name is: ", p.name)
}
And call them with:
me.sayName() // My name is Max
If we want to change the data of the Person we need to define the function to a pointer of Person, that sounds a bit scary at first but it’s easier than you think if you look at the code:
func (p *Person) birthday() {
	p.age++
}
It’s only that asterisk that needs to be there. If we have a function sayAge:
func (p Person) sayAge() {
	fmt.Printf("I'm %d years old\n", p.age)
}
We can test our birthday function:
me.sayAge() // I'm 28 years old
me.birthday() // change value of age
me.sayAge() // I'm 29 years old
If we would forget the little asterisk to indicate we want a pointer rather than a copied value and say we have a birthday2 function:
func (p Person) birthday2() {
	p.age += 1
}
And call it:
me = Person{"Max", 28}
me.birthday2()
me.sayAge() // I'm 28 years old
It would have no effect, inside the function the struct would be different but not at the outside world. If you want to know more about that you can google something like “call by reference vs call by value”.
Go doesn’t have any inheritance mechanism, but there is something called duck typing.
type Pupil struct {
	Person
	grade int
}
A Pupil is a person but also in a specific class.
to instantiate such a struct is not as easy as it could be but it works like this:
schoolkid := Pupil{Person{"Max", 14}, 7}The cool thing is that we can use our functions from our Person type for the Pupil type:
schoolkid.sayAge() // 14
schoolkid.birtyhday()
schoolkid.sayAge() // 15
Interfaces
Let’s assume we want to create an interface which must implement the Say function:
type Speaker interface {
	Say(string)
}
And let us assume we have our Person struct from the struct paragraph and want to implement the Say function for the Speaker:
// interface implementation of Say method to become a Speaker
func (p Person) Say(msg string) {
	fmt.Println(p.name + ": " + msg)
}
We can now create a function which accepts a Speaker as an argument:
func speakSomething(s Speaker) {
	s.Say("something")
}
Now we can define a different struct, say a Dog and a Say function for that struct:
type Dog struct {
	name string
}

func (d Dog) Say(msg string) {
	fmt.Println(d.name + ": bark bark bark")
}
Now we can use this function on our structs and like the other functions it even works on the Pupil struct:
speakSomething(me) // Max: something
speakSomething(schoolkid) // Max: something
dog := Dog{"Bello"} // instantiate a Dog
speakSomething(dog) // Bello: bark bark bark
Nice!
Errors
How do we do error handling in Go? It might be way easier than you think. We use the multiple return values for us and check for an error. Let us create a function that can return an error:
// An error is a datatype
// often used as a second return value
func someFuncThatCanFail(shouldFail bool) (int, error) {
	if shouldFail {
		// create a new error with a message
		return 0, errors.New("something went wrong")
	}
	return 0, nil
}
Now when we call this function we check if the second return value is nil or not:
var _, err := someFuncThatCanFail(false)

// would not be called
if err != nil {
	// prints the error, in a real application you might want to
	// log this into a file or something
	fmt.Println(err)
	// do error handling
}

// would be called
_, err = someFuncThatCanFail(true)
if err != nil {
	fmt.Println(err)
	// do error handling
}

// a panic prints a message to stdout and exits the application
// with an exit value != 0
panic("THIS IS A PANIC AND EXITS THE APPLICATION IMMEDIATELY")
If you have an error which you can’t handle you have always the ability to do a so-called panic which exits the application at this point.
Modules
Every programming language needs to have some kind of module or code separation system. As you may have noticed in the hello world example, every go file needs to have a package name. This is used for our modules.
Let’s create a folder called pkg and place a file called pk.go in there:
// the name of the subpackage
package pkg

import "fmt"

// Capitalized is an exported function
func DoStuff() {
	fmt.Println("Doing stuff ...")
}

// same for constants/variables with capitalization
var MyConst string = "Some constant"

// Add function
func Add(x int, y int) int {
	return x + y
}
We use a different package name, that’s the name of the package we need to import soon. Every capitalized function, constant, variable or type is exported. You don’t need any export keyword or else. If you let your program run through Go Report Card there are linter who will tell you that you need comments above exported variables, which is good because that’s how the documentation is generated also. If you might have noticed, in every other module we used (for example the fmt module) every function call began with a capitalized letter(fmt.Println). So the standard library is also just a module.
Now let us call these filthy functions:
package main

import (
	"fmt"

	// $GOPATH/src/
	// import a module
	// if this is a github repo it would work on the same way
	"github.com/mstruebing/go-examples/08_modules/pkg"
)

func main() {
	// call DoStuff of the subpackage
	pkg.DoStuff()

	// prints the constant declared in the subpackage
	fmt.Println(pkg.MyConst)

	x := pkg.Add(1, 2)
	fmt.Println(x)
}
The only thing that needs explanation is the $GOPATH I think, the rest should be pretty clear and straightforward. Go assumes you have a $GOPATH environment variable set. There will live all your code and all your dependencies. If you don’t set this environment variable it’s in your home directory: $HOME/go/. There you can see three folders: bin, pkg, and src. In pkg are build artefacts stored. In binaries are the binaries stored if you use go installfor example: go install github.com/mstruebing/tldr/cmd/tldr/. Then you only need to add $GOPATH/bin to your $PATH environment variable and can call every binary installed via go install. src is, of course, where the code lives. There will be stored every dependency you use as well as your own code. There you will have a path like: $HOME/go/src/github.com/mstruebing/go-examples/ where the root of the repository where I store my examples is. That’s how it is working that you only need the GitHub link to the repository to use it as a dependency.
Tests
As I said earlier a test runner and benchmarker is already included in Go, so it isn’t hard to set up. At first, we create a function in a file, let’s call it tests_and_benchmarks.go😀
func add(x int, y int) int {
	return x + y
}
If we want to test that function we need to create a file tests_and_benchmarks_test.go, the prefix Test is required. You can look into the documentation of the testing package if you want to dig deeper.
func TestAdd(t *testing.T) {
	result := add(1, 2)

	// yep, as straightforward as error handling
	if result != 3 {
		t.Errorf("Expected add(1,2) to be 3, got %d instead", result)
	}
}
We can run the test with go test:
$ go test
PASS
ok      github.com/mstruebing/go-examples/09_tests_and_benchmarks       0.001s
If we let the test fail, say we change the add function to subtract instead of adding the output would be:
$ go test
--- FAIL: TestAdd (0.00s)
    tests_and_benchmarks_test.go:14: Expected add(1,2) to be 3, got -1 instead
FAIL
exit status 1
FAIL    github.com/mstruebing/go-examples/09_tests_and_benchmarks       0.001s
Benchmarks
A benchmark is as easy to write as a test.
func BenchmarkAdd(b *testing.B) {
	for n := 0; n < b.N; n++ {
		add(10, 20)
	}
}
Pay attention to the b.N usage. You will understand in a bit. To execute a benchmark in the current directory use go test -bench=.
$ go test -bench=.
goos: linux
goarch: amd64
pkg: github.com/mstruebing/go-examples/09_tests_and_benchmarks
BenchmarkAdd-8          2000000000               0.30 ns/op
PASS
ok      github.com/mstruebing/go-examples/09_tests_and_benchmarks       0.630s
You can see how often your function was called (2000000000, this is the b.N) and how many operations in a nanosecond where executed. In the end, you can see how long it took to execute the whole benchmark.
Now let us add a second add function with a loop inside to make it slower:
func add2(x int, y int) int {
	sum := 0
	for i := 0; i < 10000; i++ {
		sum += i
	}

	return x + y
}
An addition benchmark:
func BenchmarkAdd2(b *testing.B) {
	for n := 0; n < b.N; n++ {
		add2(10, 20)
	}
}
And we execute the benchmark again:
$ go test -bench=.
goos: linux
goarch: amd64
pkg: github.com/mstruebing/go-examples/09_tests_and_benchmarks
BenchmarkAdd-8          2000000000               0.30 ns/op
BenchmarkAdd2-8           500000              2961 ns/op
PASS
ok      github.com/mstruebing/go-examples/09_tests_and_benchmarks       2.139s
We can see that the second benchmark gets executed much less than the first one. Go figures out a good number for b.N to get reliable results. From the docs:
During benchmark execution, b.N is adjusted until the benchmark function lasts long enough to be timed reliably.
Goroutines
Let us order coffee. We will order different kind of coffees which need different times to finish.
type Coffee struct {
	kind string // kind of coffee
	name string // name of the customer
	id   int    // id to show it is executed async
}
This is the Coffee-type. A Coffee has a kind, a name which customer ordered it and an id. The order function is rather simple, we check for the kind of the coffee and use a timeout to simulate different production times.
func order(coffee Coffee, coffeChannel chan Coffee) {
	switch coffee.kind {
	case "cappuccino":
		time.Sleep(1000 * time.Millisecond)
		coffeChannel <- coffee
		break
	case "espresso":
		time.Sleep(2000 * time.Millisecond)
		coffeChannel <- coffee
		break
	case "flat white":
		time.Sleep(3000 * time.Millisecond)
		coffeChannel <- coffee
		break
	case "macchiato":
		time.Sleep(4000 * time.Millisecond)
		coffeChannel <- coffee
		break
	}
}
We are communicating via channels here. The function order gets a channel of type Coffee called coffeeChannel where it can send messages to. Think of it as something like a stream where you can send and receive messages on. We are only sending messages here. You can remember if you send or read from a channel by the position of the <-: channel <- message writes to the channel and someVar <- channel reads from the channel and assign the value to the variable.
Our main function looks like this:
func main() {
	coffeChannel := make(chan Coffee)

	go order(Coffee{"macchiato", "Roman", 1}, coffeChannel)
	go order(Coffee{"espresso", "Marcel", 2}, coffeChannel)
	go order(Coffee{"flat white", "Carsten", 3}, coffeChannel)
	go order(Coffee{"cappuccino", "Max", 4}, coffeChannel)

	for i := 0; i < 4; i++ {
		coffee := <-coffeChannel
		fmt.Println(fmt.Sprintf("%d: Coffee for %s ready", coffee.id, coffee.name))
	}
}
We create a coffeeChannel and order different coffees. Note that we are using the **go** keyword to say that we want this to be executed concurrently. When we execute this the result looks like this:
$ go run coffee.go
4: Coffee for Max ready
2: Coffee for Marcel ready
3: Coffee for Carsten ready
1: Coffee for Roman ready
If we would have a program where the different functions wouldn’t take so much of a difference we would also get different result orders every time we run it.
Now, if we have a more complex application where we need to calculate lots of stuff we also would see that our processor will be used with as many as possible power.
Let’s use the fibonacci-loop function from dotnetperls:
func fibonacci(n int) {
	a := 0
	b := 1
	// Iterate until desired position in sequence.
	for i := 0; i < n; i++ {
		// Use temporary variable to swap values.
		temp := a
		a = b
		b = temp + a
	}

	fmt.Println(a)
}
If we execute that and monitor the CPU usage we can see one core goes up to 100% usage:
fibonacci(10000000000)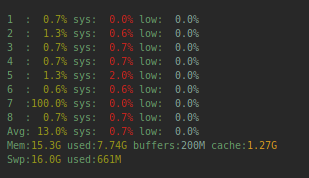
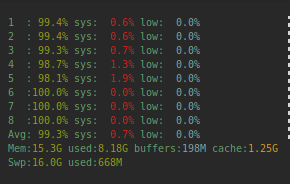
If we now use multiple goroutines:
go fibonacci(10000000000)
go fibonacci(10000000000)
go fibonacci(10000000000)
go fibonacci(10000000000)
go fibonacci(10000000000)
go fibonacci(10000000000)
go fibonacci(10000000000)
go fibonacci(10000000000)

fmt.Scanln() // to prevent the program from terminating
We can see a slightly higher CPU usage:
There could much more be said about goroutines, but I will leave it at this now.
A Simple Web Server
Let’s implement a simple web server. At first, we create a function which gives us a port number, either via an environment variable or some predefined port
const DEFAULT_PORT = 3000
func getPort() string {
	port, err := strconv.Atoi(os.Getenv("PORT"))
	// strconv.Atoi("") == 0
	if port == 0 || err != nil {
		port = DEFAULT_PORT
	}

 	return fmt.Sprintf(":%d", port)
}
This gives us an integer port we want our application to listen on.
Now our main function:
func main() {
	http.HandleFunc("/", rootHandler)
	log.Fatal(http.ListenAndServe(getPort(), nil))
}
We set a function to be called at access on the / endpoint, so our root endpoint, this function is called rootHandler and will be implemented now. After that, we say that we want to listen and server on our defined port. The function will block further execution and only returns an error if an unexpected error occurs. Now the rootHandler:
func rootHandler(w http.ResponseWriter, r *http.Request) {
	fmt.Fprintf(w, "Hello from our Webserver!\n")
}
We get two parameters in, the http.ResponseWriter and the http.Request. We write a string to our ResponseWriter. Now, if we start our program without environment variables and curl the url curl localhost:3000we get our expected result:
$ curl localhost:3000/
Hello from our Webserver!
How would we add another route? We only need to add another http.HandleFunc in our main function:
http.HandleFunc("/endpoint", endpointHandler)Of course, we need to implement that handler, and we want to do a POST, GET and OPTIONS request and handle differently on each:
func endpointHandler(w http.ResponseWriter, r *http.Request) {
	switch r.Method {
	case "GET":
		fmt.Fprintf(w, "This is a GET request")
	case "POST":
		fmt.Fprintf(w, "This is a OPTIONS request")
	case "OPTIONS":
		fmt.Fprintf(w, "This is a OPTIONS request")
	default:
		fmt.Fprintf(w, "This is an unsupported request method")
	}
}
I think you can imagine that we can call other functions in these case statements which do some more logic like getting data from a database, inserting data, do other requests or anything else.
Logging web server events to a file
Let’s say we want to log everything that is an unsupported request method because we want to analyze how many hacking attempts or misusing of our API is happening. At first, we implement a new module logger.go with only one function Log:
func Log(msg string) bool {
	// file descriptor
	// os.O_APPEND|os.O_CREATE|os.O_WRONLY are flags to indicate what to do with that file
	// 0644 is filemode when its created
	f, err := os.OpenFile("log.txt", os.O_APPEND|os.O_CREATE|os.O_WRONLY, 0644)
	// close the file descriptor at the end of the function
	defer f.Close()

	if err != nil {
		fmt.Println(err)
		return false
	}

	// write string to file
  	_, err = f.WriteString(fmt.Sprintf("%s\n", msg))

	if err != nil {
		fmt.Println(err)
		return false
	}

	return true
}
Here we are using some of our already acquired knowledge. We are using error handling and defer. The remaining parts are all out of the standard library and can be looked up there. We create a file log.txt if it’s not already there and if it’s there our data will be appended and we are writing a time string and a message into the file.
Now let’s call the the Log function inside our default branch:
// import the logger
import "github.com/mstruebing/go-examples/11_webserver/logger"
// ...
default:
	fmt.Fprintf(w, "This is an unsupported request method")
	logger.Log(fmt.Sprintf("ERROR: Unsupported request made: %s", r.Method))
Now if we start the server either with go run or compiling it an run the binary and we make a DELETE request, for example, we can see the log.txt file being created and logging the falsy request method:
$ curl -X DELETE localhost:3000/endpoint
This is an unsupported request method%                                                                                                                          ➜ 11_webserver
$ cat log.txt
ERROR: Unsupported request made: DELETE
$ curl -X PUT localhost:3000/endpoint
This is an unsupported request method%                                                                                                                          ➜ 11_webserver
$ cat log.txt
ERROR: Unsupported request made: DELETE
ERROR: Unsupported request made: PUT
Cross Compiling
Cross-compiling works with environment variables. If you do go build go automatically uses your operating system and architecture to compile the binary. If you now want to compile your binary for a different system, say you have a Linux 64bit and want to compile it to run on a mac 64bit system you could do GOOS=darwin GOARCH=amd64 go build and go will produce a binary that can be run on a Mac but not on my machine. If you want to name the binary accordingly you could do something like: GOOS=darwin GOARCH=amd64 go build -o darwin-binary. You can see a complete list of support environment variables here: Installing Go from source - The Go Programming Language.
That’s all for now. If you have any questions, notes or anything else you can reach out to me on Twitter: @mxstrbng or open an issue on Github: go-examples.